Showing posts with label Gwen Marston. Show all posts

Saturday, September 6, 2025

Quiltin' Meetin' With Show 'N' Tell

This evening, we all met up at Kirsten and Jane's place for a quilt meeting.  What a fun time!  Astrid and Kirsten have been collaborating on a Gwen and Freddie tribute quilt.  What a surprise!

Of course, it is called "Gwenny's Baskets".  It is simply lovely.  I think this year we have made more quilts than ever, and we still have four months left in the year.  Of course, getting ready for a themed quilt show has a lot to do with it.  

This is the first time to one of our meetings, for Gracie.  She brought several of her quilts to show us.  This is her liberated log cabin quilt.  She quilted it herself on her domestic sewing machine.

This is a liberated medallion quilt, made by Gracie.  She really fits in with our group.  It has nothing to do with her bringing chocolate chip cookies and kitty measuring tapes for us.
This is Gracie's Fractured Log Cabin quilt.  She just completed it this week.  She had been working on it to contribute to our upcoming quilt show.  The show is at Expo Idaho on Sept 26 and 27.  Kirsten and Jane have all the quilts for the show curated, and we are all working on last minute things that need to be done.  We went over those at our meeting, then had a fun time chatting and eating cookies.

Tuesday, July 8, 2025

Jane's Second Tribute to Gwen Marston Quilt

Kirsten here.  Jane has completed another tribute quilt in honor of Gwen Marston.  One of the many quilting things Gwen did, was collecting old/antique blocks then making quilts with them or in the style of them.  Jane has a pile of these hand-pieced nine-patch blocks.  She has no idea how old they are or who actually did them.  She got them from Vesta, but she is not sure Vesta did them or if she collected them from someone else.  That is just the thing; we get blocks from people who have passed away, or we get them at quilt shows or yard sales.

Here is Jane's latest completed quilt.  She is really good at piecing, the blocks, on-point.  She just got the binding on it on Sunday.  We had a little back-yard BBQ, so she was able to show it off to the gang.   

Saturday, May 10, 2025

Everyone is Being Creative!

I think we decided on this "Gwen and Freddy Challenge" a little close to our upcoming show in September.  But if we each make at least one, we will have something inspirational to display in memory of these great quilters and teachers. Kirsten and Edna have made Gwen and Freddy quilts before, so we have those for the show.  We are hoping to have ten.  Jane is working on her second one.   

Edna e-mailed me a photo of what she has got going on her design wall.  Edna said she is making a bunch of liberated nine-patch blocks and on-point squares in squares.  I am really liking those bright nine-patch blocks!

Of course, Marsha hangs out with me.  Here is what she has on her design wall.  She is making lots of liberated stars, liberated log cabins, and square-in-a-square blocks for her quilt.  It is going to be interesting to see all the different quilts!  We are certainly off to a great start.

Thursday, May 1, 2025

Jane's Tribute to Gwen Marston

Astrid here, again.  It seems Jane has been working uncollaboratively on this solid-colors quilt.  She finished it last night and brought it over today, to show me.  Jane loves the many quilts designed by Gwen Marston.  Gwen Marston was born in 1936 and passed away in 2019.  She has had a huge impact on thousands of quilters, worldwide.  I feel that her biggest contribution to quilting was her gift of inspiring other quilters to break away from patterns and design their own quilts, while developing their own styles, which grew out of the traditional.

This is Jane's first quilt using all solid-colored fabrics.  It looks magnificent!  She said she was playing around just sewing different colored pieces together and then cutting them and reassembling them.  When she put them on her white design-wall she had a little space between them and decided she liked the white breaking up her blocks, so that is how she improvised her own quilt design.

Friday, April 18, 2025

Astrid's "GweFre" Quilt is Fabulous!

I had so much fun designing this quilt and making the "parts".  I have some parts left over, that will likely go into another tribute quilt.  Jane is thinking of doing a vertical row quilt and include some of the parts.  I think Jane and I will do some collaborative quilting!

Marsha took this photo of my quilt and I.  It is considered a medallion quilt, which is one of the types Gwen Marsten wrote an entire book about and hosted classes on.  The color scheme is all Freddy.

Thursday, January 31, 2019

Session 3, Jane's January Tutorials

Gosh! I am cutting it close.  This third quilt, although made completely of blocks already made, got a little out of control.  Remember those extra 16-patch blocks?  I decided to start with them, in a row down the center.  I may make another quilt with only three in the row down the center.  I used four in this one.  So, get those orphan blocks out! My favorite quilters, Freddy Moran and Gwen Marston call it the "Parts Department".  Go to your Part Dept. and find some of those four patches and whatever else you have and put them up on the design wall with your 16-patch blocks.
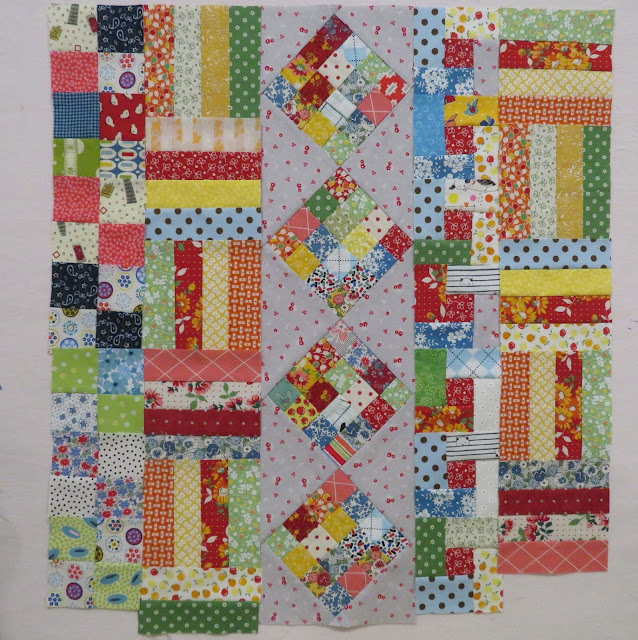
Here are my 16-patch blocks on point, on my design wall.  I am making a vertical row quilt.  I have chosen a gray with little red flowers as the background fabric.  I will also be using some left over rail fence blocks, some four-patch blocks, and some of my off-set frames blocks that look like log cabins.  You can use whatever you have that kinda goes with the color scheme of the majority of your blocks.  This quilt may seem to take a little longer, due to you are designing as you go.  I love designing as I go!
Look back at Session 1, to review how to piece these sixteen-patch blocks on point.  I like having a little extra background sticking out, so I can be flexible with my planning.  It turns out four of these on-point is fairly tall, so I will be cutting the top and bottom down a bit. You can see I have plenty underneath the bottom block.
I have put a bunch of blocks, in vertical rows, on the design wall on both sides of my on-point blocks.  I see I will have some not-coming-out-exactly-even rows.  The great thing about this design is it's thirties and forty-ishness.  You can use what I call cheaty blocks to make up the extra length in the rows.  Or you can make a couple of the blocks in the rows, a little taller (longer), but you will have to make fresh blocks to add in for that. 
I have rearranged my rows to see how I like it this way, but it still seams a bit busy.  I think I will cut a couple solid strips of the gray background to break up the busyness.

Okay, I have sewed the blocks in the two rows on the right together.  You can see that they have shrunk up quite a bit.  I think I can add two more to the narrower row and maybe a three-strip section to the bottom of the rail fences row.  I know I will need to do the same on the left side.  I have not sewed them together yet.
I have cut a couple of gray strips to add in, and have rearranged my rows again.  I think this is the most pleasing design. I did sew the cheaty three-strip section on the bottom of the left rail fence row.  Whatever is left hanging off the bottom, I will trim off when I square up the quilt top.
This view shows it all sewed together with the raggedy bottom edge.  Now it is time to square this puppy up!  I laid it on my cutting board and put the top edge on my right.  I squared up the top edge first, then keeping the top lined up straight, I cut the bottom straight.  I did the same to both sides.
Here it is all squared up!  The full view of the finished quilt top.  Kirsten took the photos.  They are a little from the side to get the best light. I think the colors of the fabrics came out well that way.
I am showing off my fabulous new Sixteen Patch Vertical Row Quilt.
It is a little larger than the others, but it will fit better on my big bed!
Thank you for checking out my January tutorials!