Showing posts with label American Girl Dolls. Show all posts

Thursday, November 20, 2025

Gracie Completes Her Rail Fence Quilt!

Greetings and happy November!  Kirsten here.  I helped Gracie hold up her latest creation so Marsha could take a photo of it. I am glad Marsha came over, as we had a lot to talk about, as usual.  Gracie and I have been trying out a Husky Star sewing machine, that MaryKaye gave us, when she moved back to California.  It had only one foot, so we could not zig-zag or make any fancy stitches.  We found out that C's old Necchi uses the same size feet, so we got the darner on there and Gracie stippled her quilt all over.  It is such an amazing quilt job!

P.S. With the cooler weather, I sometimes like to stay in my jammies, all day, and just sew.

Thursday, October 16, 2025

Which Hat did Gracie Choose?

Gracie chose her hat.  The one she did not choose is supposed to be for Marsha, but I think Willa has captured it for her own.  Astrid has been a very busy sewer these last couple of weeks. She made Willa a stuffed doll named Tilly.  Tilly is a little freaky looking.  

Gracie chose the tall hat with the wide brim!  I think Willa is sneaking up on Gracie, with her Tilly doll!  Who is doing some quilting??

Saturday, September 6, 2025

Quiltin' Meetin' With Show 'N' Tell

This evening, we all met up at Kirsten and Jane's place for a quilt meeting.  What a fun time!  Astrid and Kirsten have been collaborating on a Gwen and Freddie tribute quilt.  What a surprise!

Of course, it is called "Gwenny's Baskets".  It is simply lovely.  I think this year we have made more quilts than ever, and we still have four months left in the year.  Of course, getting ready for a themed quilt show has a lot to do with it.  

This is the first time to one of our meetings, for Gracie.  She brought several of her quilts to show us.  This is her liberated log cabin quilt.  She quilted it herself on her domestic sewing machine.

This is a liberated medallion quilt, made by Gracie.  She really fits in with our group.  It has nothing to do with her bringing chocolate chip cookies and kitty measuring tapes for us.
This is Gracie's Fractured Log Cabin quilt.  She just completed it this week.  She had been working on it to contribute to our upcoming quilt show.  The show is at Expo Idaho on Sept 26 and 27.  Kirsten and Jane have all the quilts for the show curated, and we are all working on last minute things that need to be done.  We went over those at our meeting, then had a fun time chatting and eating cookies.

Wednesday, August 6, 2025

So Much Going On!

Marsha here.  Yes, yes, we are gearing up for our quilt show in September.  However, P & C went on another camping trip.  They invited Willa and I to come along.  We went hiking on the Payette National Forest in the western area of Idaho.  

Here is Willa hiking along Hornet Creek.

Here we are taking a break.  It was beautiful up there!
More quilting posts to come.  Bye for now.

Saturday, August 2, 2025

Kuna Days Parade, Today!


Jane here!  We had so much fun at the Kuna Days Parade today.  It started out breezy and overcast which made it less hot in the waiting for the parade to get started.  About half-way through, Gracie fell over.  Marsha managed to help her up, so she could wave some more to the crowd.  We were all a bit wind-blown by the time it was over.  It was a great crowd this year.  

The parade theme is "Under Western Skies", so we all wore our bandanas.  We put Kirsten's down-on-the-farm quilt on this side of our float.  That is Gracie in the middle.
L-R:  Kirsten, Edna, and me (Jane)  The amazing thing is how noisy it was this year, as we were followed by 15 motorcycle riders with very loud engines. 

Thursday, May 1, 2025

Jane's Tribute to Gwen Marston

Astrid here, again.  It seems Jane has been working uncollaboratively on this solid-colors quilt.  She finished it last night and brought it over today, to show me.  Jane loves the many quilts designed by Gwen Marston.  Gwen Marston was born in 1936 and passed away in 2019.  She has had a huge impact on thousands of quilters, worldwide.  I feel that her biggest contribution to quilting was her gift of inspiring other quilters to break away from patterns and design their own quilts, while developing their own styles, which grew out of the traditional.

This is Jane's first quilt using all solid-colored fabrics.  It looks magnificent!  She said she was playing around just sewing different colored pieces together and then cutting them and reassembling them.  When she put them on her white design-wall she had a little space between them and decided she liked the white breaking up her blocks, so that is how she improvised her own quilt design.

Monday, February 24, 2025

Florals, Plaids, Stripes, Polka Dots, Hedge Hogs, Rabbits, and Ducks Oh My!

Many years ago, we were told that you do not mix florals, plaids, stripes, and polka dots, which does not even include hedge hogs, rabbits, or ducks.  I must state that fashion, home decor, and quilting sure was boring back then.  Those days are over baby!


Feel free to use this pallet of colors, anytime.  I, Kirsten, finished my vertical strip quilt with amazing colors, especially the yellows and purples (and all the rest!).  It has all the things in it, that I was told could not go into the same project.  My message is to all my quilting friends out there, to do what makes you happy and don't listen to the fuddy-duddys.   Happy quilting! 

Tuesday, November 5, 2024

Christmas Quilts

It would seem some of us are on a red and green or a Christmas quilt kick.  Marsha finished her Christmas quilt, just as our weather has finally changed and it truly feels like November.  We met at her and Astrid's place and had tea and apple pie, as we just visited for a few hours.  I knew Marsha was working on a red and green quilt, but then she surprised us with a fabulous Christmas quilt.  


It is a medallion quilt!  What an impact the color and design make!  Marsha has come a long way in her quilting skills and design ideas.


Thursday, October 24, 2024

Edna's Visit

When Edna came in August, she brought some quilts she finished this year.  We have all been pretty busy, even after our quilt show was over.  We recently met at Marsha and Astrid's place for a potluck and a bit of show and tell.

Edna sent us a photo, in July, of this one when it was just a quilt top.  She managed to get it finished before her trip up here, to help us with the quilt show.  I like the earth fabrics and dragon flies on this one.

This quilt is called Spinning Star.  It seems there are some videos out there that instruct quilters to use a "right on the edge" seam to make these star blocks.  Edna just added a quarter inch width and a half inch length to the white strips that make the stars, so her quilt has quarter inch seams that won't pull out with the least bit of handling.

Finally, Edna made this stunning Christmas quilt with some yule-tide scraps given her by a friend.  We had a wonderful visit with Edna, and it was so nice having her with us for a while.  She promised to keep us updated on her quilt adventures.

Friday, September 20, 2024

Welcome!

With all the hard work, planning, making, and then running our "Good Friends Quilt Show", we forgot to post a photo of our amazing welcome sign.  It was the first bit, we completed, that made us feel we were really getting somewhere.  It is at the entrance of our show.  The first photo, below, is when we were working on getting everything set-up.  The second photo, below, is on the first day of the show.


Thursday, August 15, 2024

Good Friends Quilt Show!

Our "Good Friends Quilt Show" is a labor of love.  We have all been working tirelessly to get it going.  Tomorrow is opening day!

Astrid brought in a ton of clothespins, that Edna and Carol painted.  We want to display our quilts in style.
Flashy clothespins, oh yeah!
Marsha and Norma working together.
Astrid and Edna hard at work.
Norma helps Kirsten with quilt hanging.

Jane and Marsha hanging quilts.

We really do need a step-stool, but that blue chair worked out just fine.  We worked hard all day. We got the skirt on the table, the raffle quilt ticket collection box fixed up, and all the quilts hung.  Tomorrow, Friday, August 16, 2024, is the opening day of what we have named the "Good Friends Quilt Show."

It is at Expo Idaho in the South Exposition Bldg, August 16 thru 25, from noon to 10 PM each day.  Please come, we would love to see you there!

Sunday, June 16, 2024

Name Tag Update

Kirsten here.  I have decided the name tags need to be made of fabric and be quilted, so I have made quilted name tags.  I let Astrid know that I have now made a quilted name tag for her and the others.  Astrid and Norma came over right when I was finishing up the last one.  

They are much better than paper and brads.  I put all my paper working stuff away and put my creative fabric cap on.  Each one is unique, and Astrid and Norma were modeling them all, so I snapped a photo.  My name tag is the blue and yellow one.

Friday, June 7, 2024

We are Gearing Up for Our Quilt Show

OM Goodness!  Kirsten is making us all custom name tags to wear when we are working at the quilt show.  We have not really been working on any quilts because we are working on the show.  It is in August, and we are all so excited.  We have the venue, we have the pipe, we are working on the drape.  We have gone through our quilts and have determined exactly which ones will be presented at our show.  They are all made by Kirsten, Marsha, Jane, Edna, and I (Astrid).  We also have a quilt to raffle off!

Guess who?!! I am showing off my new, very special, name tag.

Wednesday, January 10, 2024

It Snowed Today!

We are having a snow day, today.   Jane is busy working on her annual January tutorial.  The rest of us went out and played in the snow.  Willa made a snow fisherman.  I found a stray stocking cap that fit him perfectly.  Now the sun has come out and the temperature has risen to 35 degrees.  We are all back in having hot apple cider and fixing lunch.

I dare say, Jane will have her tutorial, about how to make a Kawandi quilt, finished in a day or so.  I can hardly wait to see the finished product.

Tuesday, November 28, 2023

Astrid's Kawandi Quilt

Astrid has been extremely busy these last couple of months.  Astrid really like's making quilts that represent different cultures.  She recently went to a retreat where she met another quilter who had an amazing quilt.  She said it was a Kawandi quilt.  Astrid had taken her big box of scraps, to the retreat, so this quilt was easy to make while she was at the retreat.  

Of course, Jane was over for a visit, and she put on the new outfit that Astrid made for her.  Wow! Those rose-colored overalls and striped shirt fit her perfectly.  Jane love's her new outfit.  Jane was really impressed with Astrid's Kawandi quilt, too.  Astrid said there are lots of websites and blogs about Kawandi quilts, if you are interested.  Apparently, Kawandi is an India quilt style that was brought to India by Africans, who call their style of quilting Siddi.   If you need to write a research paper, this is a great topic, and a great way to learn about another style of quilting!

Now, Jane has a dilemma.  She cannot decide which quilting style to teach in her upcoming January tutorial; Hachi or Kawandi.

Thursday, November 16, 2023

Marsha's Coin Quilt

Something we quilters come to realize, sooner or later, is every time we make a quilt, we also make scraps.  Marsha has been trying to get all our scraps under control, but it seems like a futile activity.  She used some scraps to make a lovely coin quilt.  

Astrid helped Marsha hold up the quilt for a photo.  It is lovely and very scrappy.  Marsha said she is going to do another scrappy quilt with chunks of fabric scraps, the way Karen Brown shows in one of her videos about how to make an ugly quilt.  The funny thing is if you use the right scraps, they turn into lovely quilts, instead.  That is just one more thing we have learned about the magic of quilt making.

Wednesday, September 27, 2023

Adventurers' Return

Kirsten and I have been off camping with C and P (and Ebony, the kitty) in their amazing RV.  We went up to Lafferty Campground for a couple of days of relaxation.  Then we left there and drove over to Brownlee Reservoir, where we stayed at Woodhead Park.  We had so much fun hiking and picking sun flowers.

We enjoyed climbing on the rocks at the reservoir's edge; they were exposed when the water level went down.  The beach there is very rocky.  We had grilled hot dogs and chili and other yummy camp stuff.


In this photo you can see the RV on the hill behind us.


It is major alright to have a nice RV to collapse in after a busy day outside at the reservoir.

Thursday, September 14, 2023

Sewing While Kirsten and Jane are Off Camping Somewhere

Greetings!  Astrid here.  Jane and Kirsten have gone camping with friends C & P.  While they are gone, I am making a pair of overalls for Jane.  I already made a pair for Kirsten, and she said they were perfect for camping.  I have altered my overalls pattern a little bit, so the Jane overalls will look a little different from Kirsten's.  I am using the same mauve denim on both pairs, just different linings and accents.  

This is how Jane's overalls look so far.  I hand-sewed the heart on the front.  To make a heart, you just cut two identical heart shapes, then sew them together with right sides facing.  Then pull the front and back apart with your fingers and snip, with your scissors, a little slit, on the side you do not want facing out.  Then, you pull the heart right-side-out, through the slit and press.  Oh yeah, clip those curves before you turn the shape right-side-out.  You have a heart.  I decided not to machine sew it on, as it would look tacky, so I hand sewed it.  This pair is fully lined, so I cut two sets of every piece, one set from the mauve, and another set from the plaid lining.   I don't know if I will have them done, by the time Jane and Kirsten return.  I think they will be cute!  

Once they are complete, I will post instructions.  I have to muddle my way through and get the lining part correct, before I go posting instructions.  Smile!

Monday, January 23, 2023

Jane's January Tutorial

It is January again!  I am Jane, and I am going to show you how to make a "Quilt-As-You-Go" quilt using strips of fabric.  It is a quick and easy quilt.  As I piece the strips together, I will be quilting the quilt at the very same time.  I think this really saves on thread!

The first step in making a quilt, is to decide on numerous things.  You have to stop and think about what fabrics you have, and which ones you want to put into your creation.  I thought I knew which ones I wanted, but after I sewed the first three strips on, I changed my mind and had to do a little more auditioning before I could continue.  Enough about that now.
First, I decided how large I wanted my quilt to be.  Then, I cut out the backing for my quilt.  Yep, you do this first.  Then cut your batting to be just a little bit smaller than the backing.
Place your backing fabric face-down on your work surface.  Place the batting on top of the wrong-side of the backing fabric.  Either pin or use spray basting adhesive to secure the batting to the backing fabric.  I use spray basting adhesive.  Safety pins work just fine.
I know I want to use that amazing multi-colored fabric in this quilt, so I will choose other fabrics to go with it using the colors that are in my top choice fabric. 
Since you know how wide your batting is, you can cut some strips to audition on your laid-out backing/batting.  Just lay the strips on there and rearrange them how you like.  Remember, a quarter of an inch on either side of the strips will be sewed into the seam allowance, so overlap your strips, a little, so you can kind of gauge how many you will need.
This is what I thought I liked, but then I noticed there is no yellow in my top choice fabric.  It has a gold, but no yellow.  I also decided it did not have enough pop in it, so I tried some of the hot pink that is in my top choice fabric.
Hmmmmm.
I rummaged around and found some gold tone fabric and decided some red would give it the pop, along with more strips of my top choice fabric.  Instead of only three strips, I put in five strips of my multi-colored fabric.  The bottom row strip, I decided to piece, using the cut-off ends of some of the other fabric strips.
Time for constructing this amazing creation:
Using a Sharpie marker and your long ruler draw, a line down the side of your batting.  Place it parallel to the left edge, about a half-inch from the edge.  You will line-up all your strips on this line.  If you do not draw a line, you could end up with your strips straggling back and forth, which is okay, if you want to chop a lot of your quilt sides off, when you square it up at the end.  I don't want my quilt to be any smaller than I have already decided on.  Use a Sharpie, because the Friction pen's marks disappear when you press the strips outward.  
Lay all your strips, in order, off to the side of your backing/batting part.  Chose the two strips in center of your layout, because you are starting in the center and working in one direction, then working in the other direction. Shown above are my two center strips.
Line up with the line. Place the one on top of the other, right sides together.  Pin them to secure them, along the lower edge.  Tip:  I have always pinned to make sure the fabrics do not shift as I sew them together.  Yes, I run over my pins, and it has not been a problem.  I was taught to do it that way in school.  See the next photo to see where the seam was sewn.
You sew through both fabric strips, the batting, and the backing, all at once.
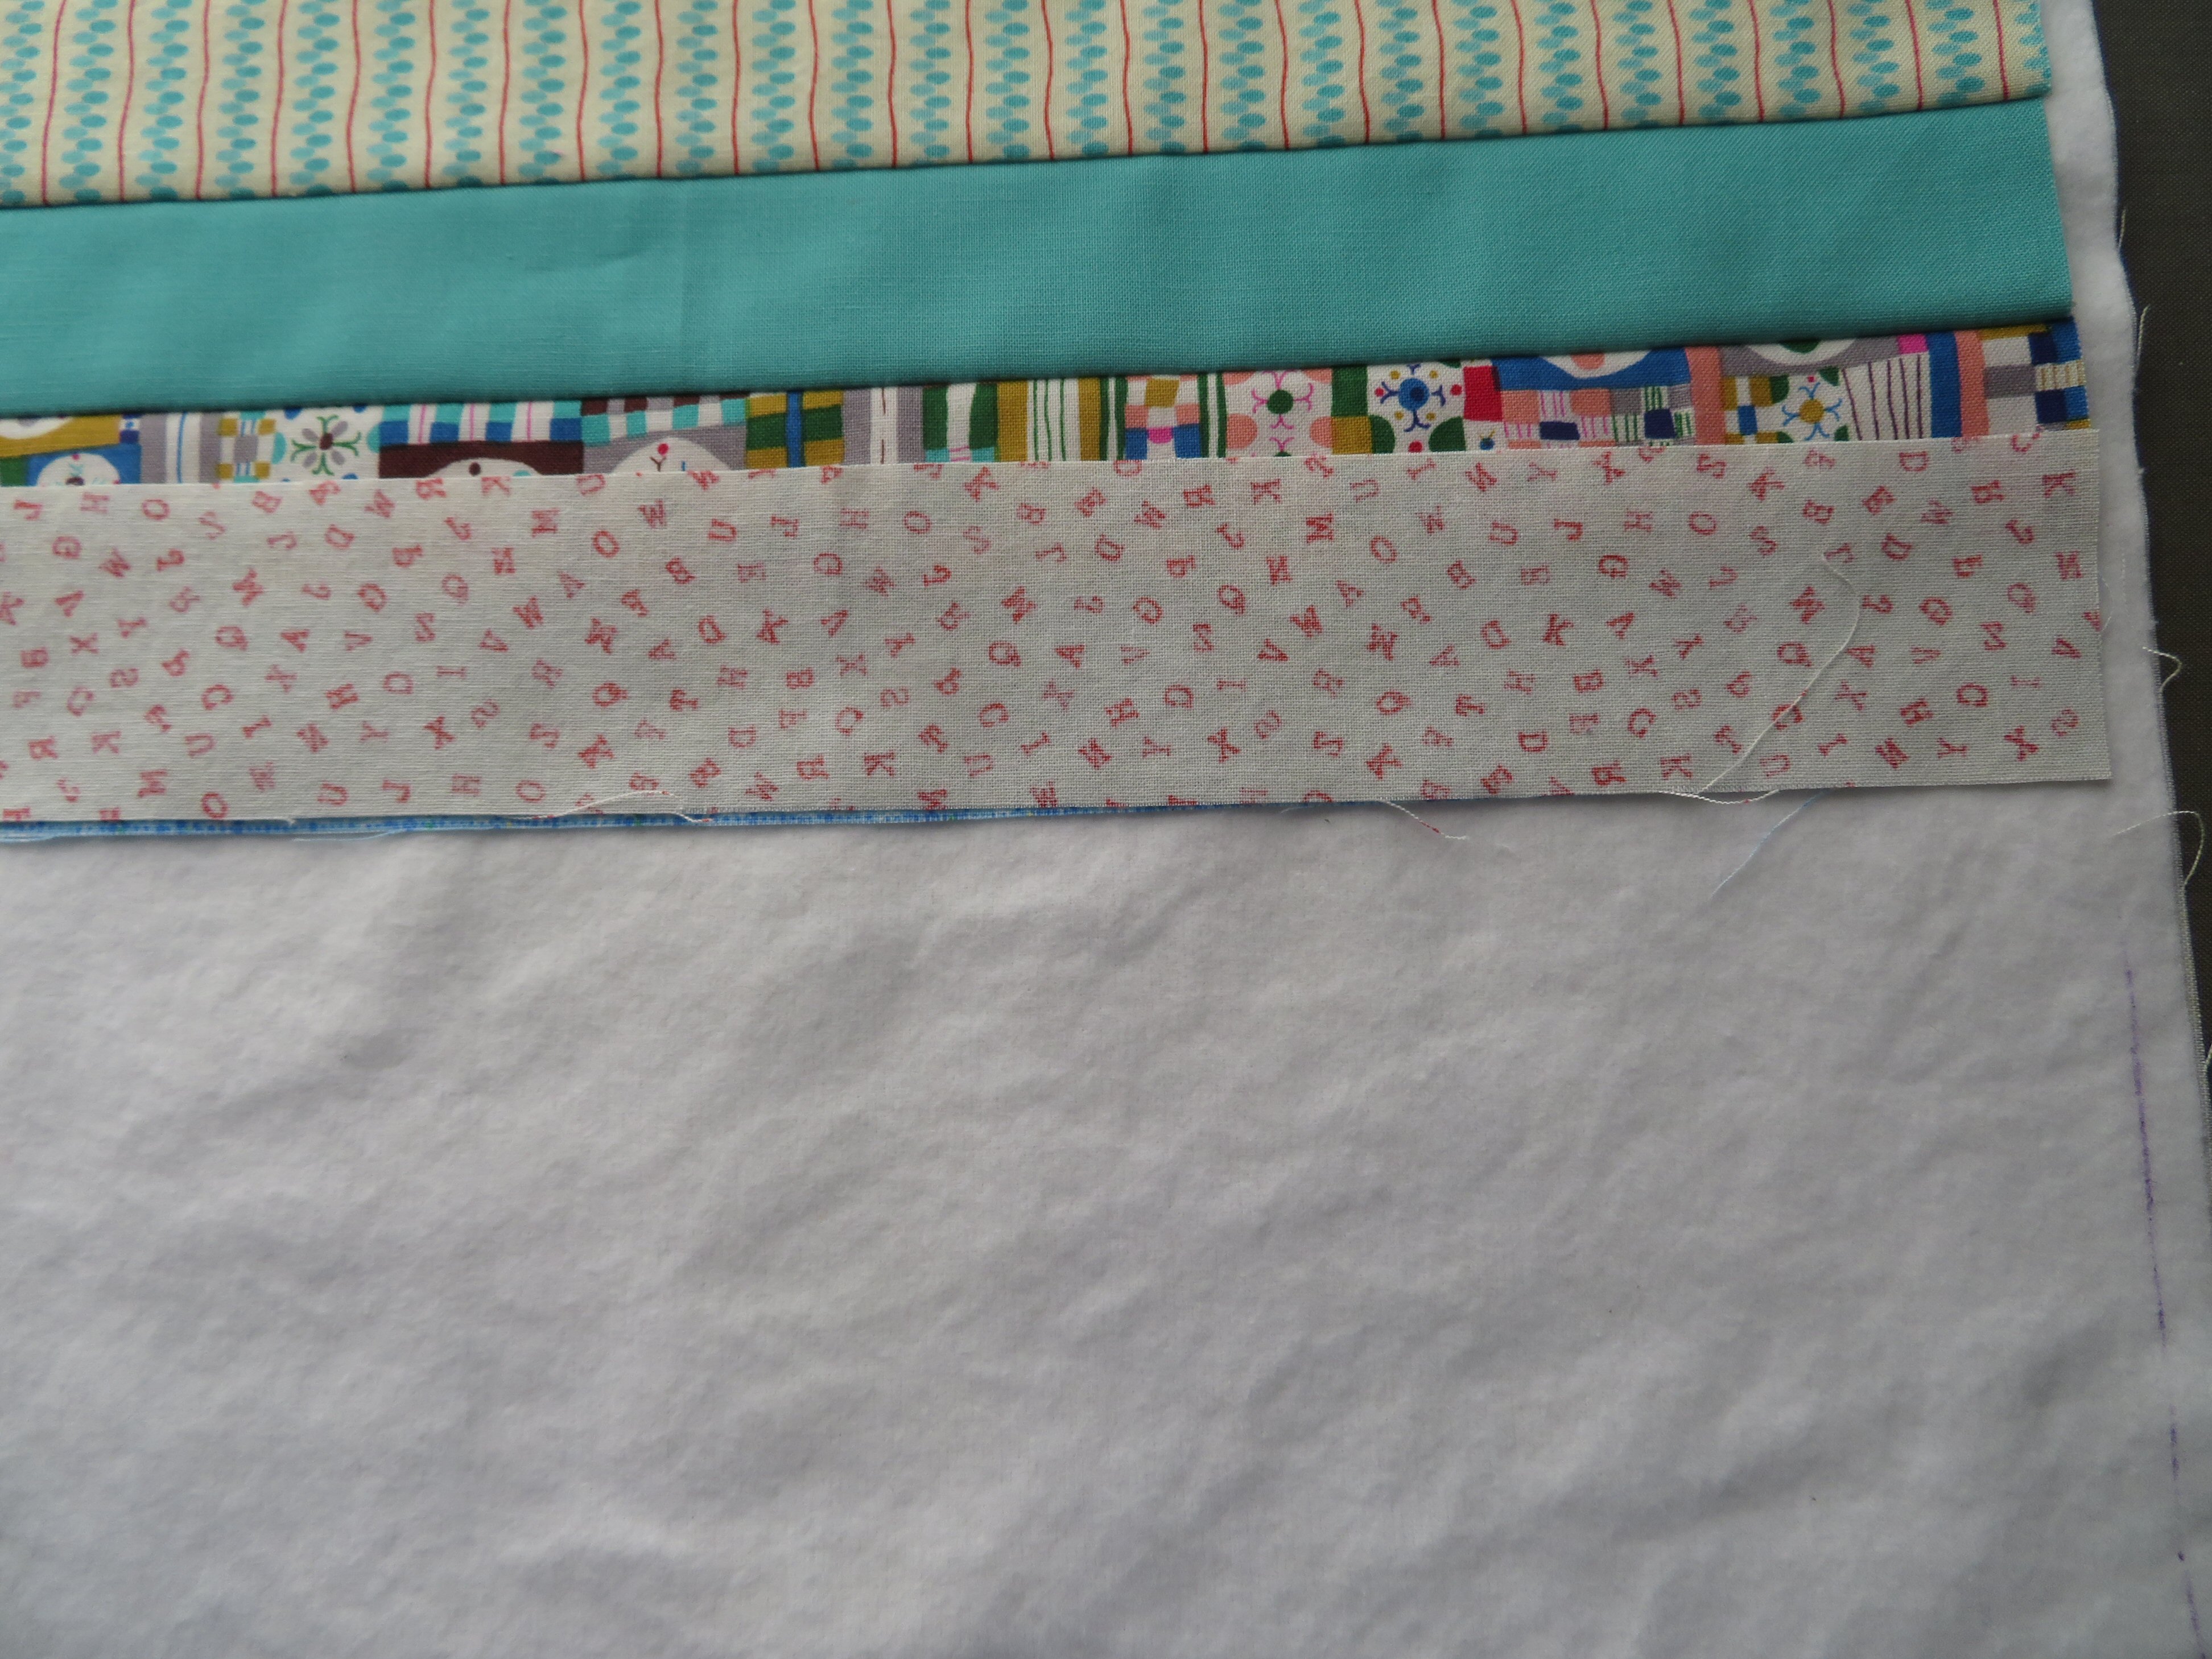
Press the lower strip away from the upper strip (the colorful one away from the blue one).  Then lay your next strip on top of the colorful one and sew it down.

Continue placing strips on, sewing them down, and pressing them away from the other strips.


At this point, the last strip on this end has been sewn down and pressed.  Rotate your project around so the marked line is now on the right-hand side as you look at your project.  
This is the half-way finished mark!  Take the next strip and lay it on the one in the center and continue sewing, pressing, and pinning strips on. 
Keep going!
The last strip is sewed on.  Notice it is wider than the others?  I did that on purpose, so it will reach as far as I want it to, then I can trim the excess off.  Now, it gets pressed out, just like the rest.

The top is trimmed off straight.  Square up the other three sides of your quilt.  
I have squared up my quilt.  It has nice straight edges on all four sides.  It is sewn together and is all quilted!
Go ahead and put a seam on the edge of the top and bottom strips, to keep them from flopping about.  This will make it nicer when you put on the binding. 
This is the back of the quilt.  You can see the quilting here.  Because you press each strip over, after you sewed the seams, the quilting is not seen on the front of the quilt.  It is like magic!
Now all you have to do is make some binding strips and sew on the binding, and your quilt is finished.
Ta-Da!
                            Quilt-as-you-go Variations

I made a quilt-as-you-go quilt last July.  I placed all the strips on an angle.  I still started in the center and worked toward the bottom, then worked toward the top to complete it.  I used strips of different widths, that had more than one fabric pieced to make each strip.  I made long strips and sewed them down, then trimmed them off.
I love this quilt.  Click on the photo and it will enlarge, so you can see the details and fabrics better.
My friend, C, made this quilt-as-you-go quilt.  She cut her strips so that they left about four inches on the left and right edges.  She sewed the strips in the middle section, just like I showed you how.  Then she made long strips for each side, made from pieced half-square triangles.  She sewed the side strips on and pressed them out, just the same.  Looking at it, you would never guess it was pieced/quilted the same way.
I hope you learned a lot from this tutorial.  Please, leave me a comment!